How to Create Stunning Dashboards with Dashboard Ninja: A Step-by-Step Guide
Odoo
5 MIN READ
June 7, 2024
![]()
Dashboard Ninja has become one of the most popular apps on the Odoo App Store in response to the growing demand for Odoo dashboard solutions, receiving consideration from a wide range of sectors.
Odoo Dashboard Ninja stands out as a top choice for businesses seeking to harness the power of data to drive decision-making and optimize performance. With its intuitive interface and Dashboard Ninja with AI features, Dashboard Ninja offers a comprehensive solution for creating dynamic and insightful dashboards within the Odoo ecosystem.
Ksolves’ developers deserve credit for making Dashboard Ninja stand out among Odoo dashboard apps. Their forward-thinking approach has not only improved how businesses use data for decisions but also changed how people see business intelligence tools in Odoo. Dashboard Ninja’s mix of easy design and strong analytics makes it a game-changer, helping businesses work better and grow faster.
Dashboard Ninja with AI offers businesses a powerful way to make the most of their data. Step-by-step dashboard creation with AI, helps users understand their data better. Whether you’re keeping an eye on important numbers, watching sales patterns, or studying how customers behave, Dashboard Ninja with AI helps you use data to make cognitive decisions.
In the tech-savvy world, having tools like Odoo Dashboard Ninja is key to growing your business and staying ahead of others.
How to create dynamic dashboards using Dashboard Ninja
Effective dashboard design can turn unstructured data into insightful knowledge that facilitates performance monitoring, trend identification, and data-driven decision-making. Dynamic dashboard development is made easier with Dashboard Ninja, a sophisticated tool. We will look at how to make dashboards with Dashboard Ninja in this step-by-step tutorial:
Step 1: Getting Started with Dashboard Ninja
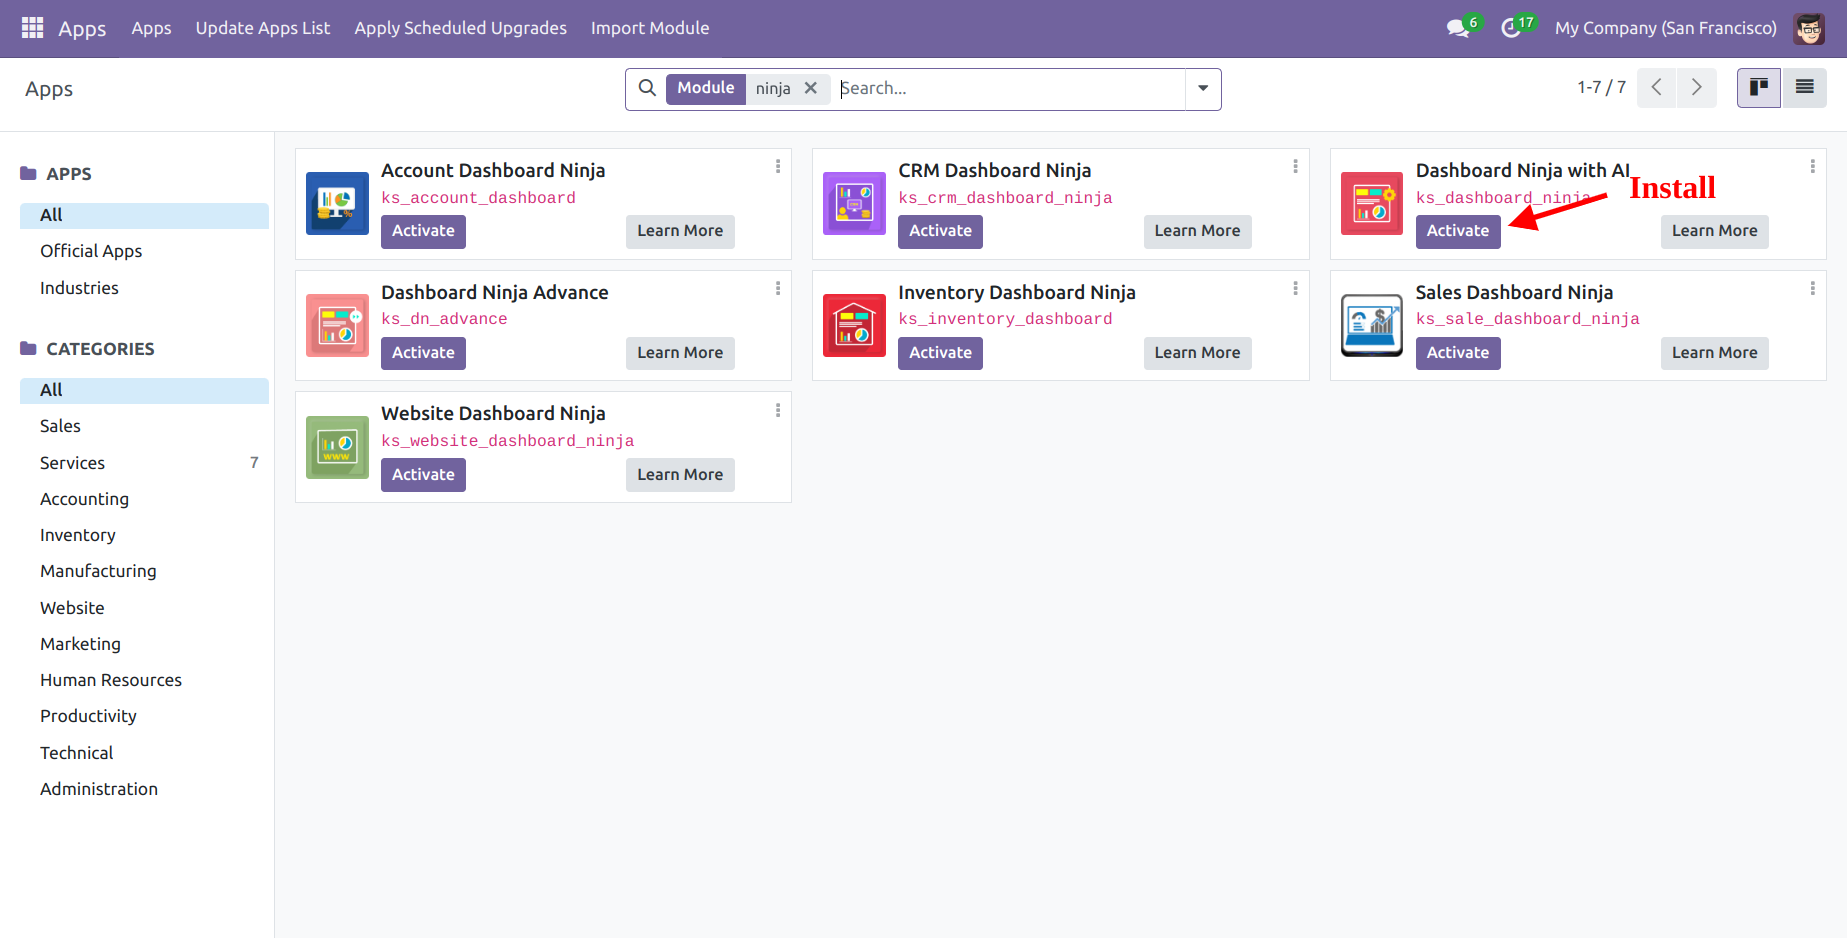
1.1 Installation and Setup
First, you need to install Dashboard Ninja. This can be done by downloading the module from one of the official websites https://apps.odoo.com/apps/modules/17.0/ks_dashboard_ninja/ or dashboard-ninja-with-ai-25 | Ksolves-store. Once installed, add to the location where you keep your Odoo custom addons and restart the server. In the Odoo interface go to Apps→ Update App list. Search for the application and “Activate”, and begin the setup process with the application.
Step 2: Designing Your Dashboard
You can either choose to create your dashboard manually, by defining the specific metrics and visualizations you need, or leverage AI to automatically generate a dashboard based on your data. This flexibility makes Dashboard Ninja a powerful tool for both novice users and experienced data analysts. Let’s explore both Manual and AI processes one by one.
2.1 Creating a New Dashboard Manually
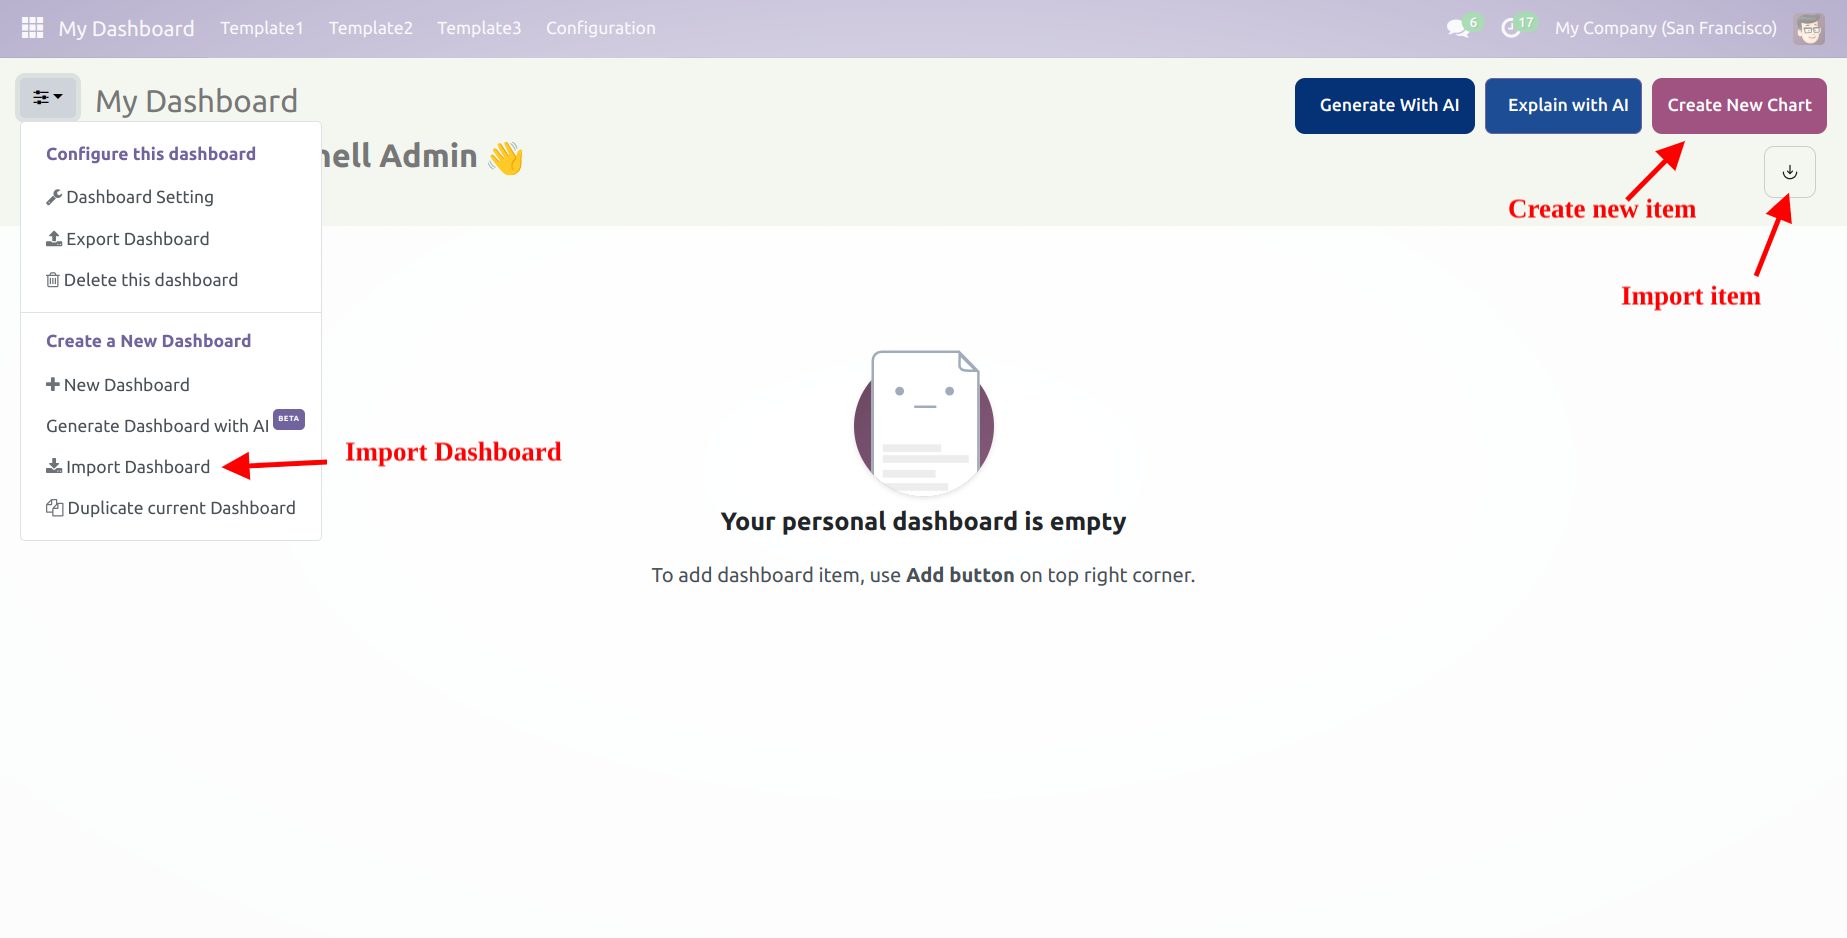
Launch Dashboard Ninja and you will see “My Dashboard” is already created. If you want to create a new dashboard simply click on the icon in the top left corner and then click on “New Dashboard”. This involves naming your Dashboard and selecting the other fields as per your requirement. Click on Save and your new dashboard will be visible in the top header.
2.1.1 Data Import
In the manual process, you can import an existing dashboard in JSON format.
The tool offers seamless integration with many data sources, making it easy to pull in datasets. Ensure your data is clean and properly formatted for the best results.
2.1.2. Creating Different Items
Dashboard Ninja with AI supports 17 different charts and items. To create items or charts manually on the dashboard click on Create new chart.
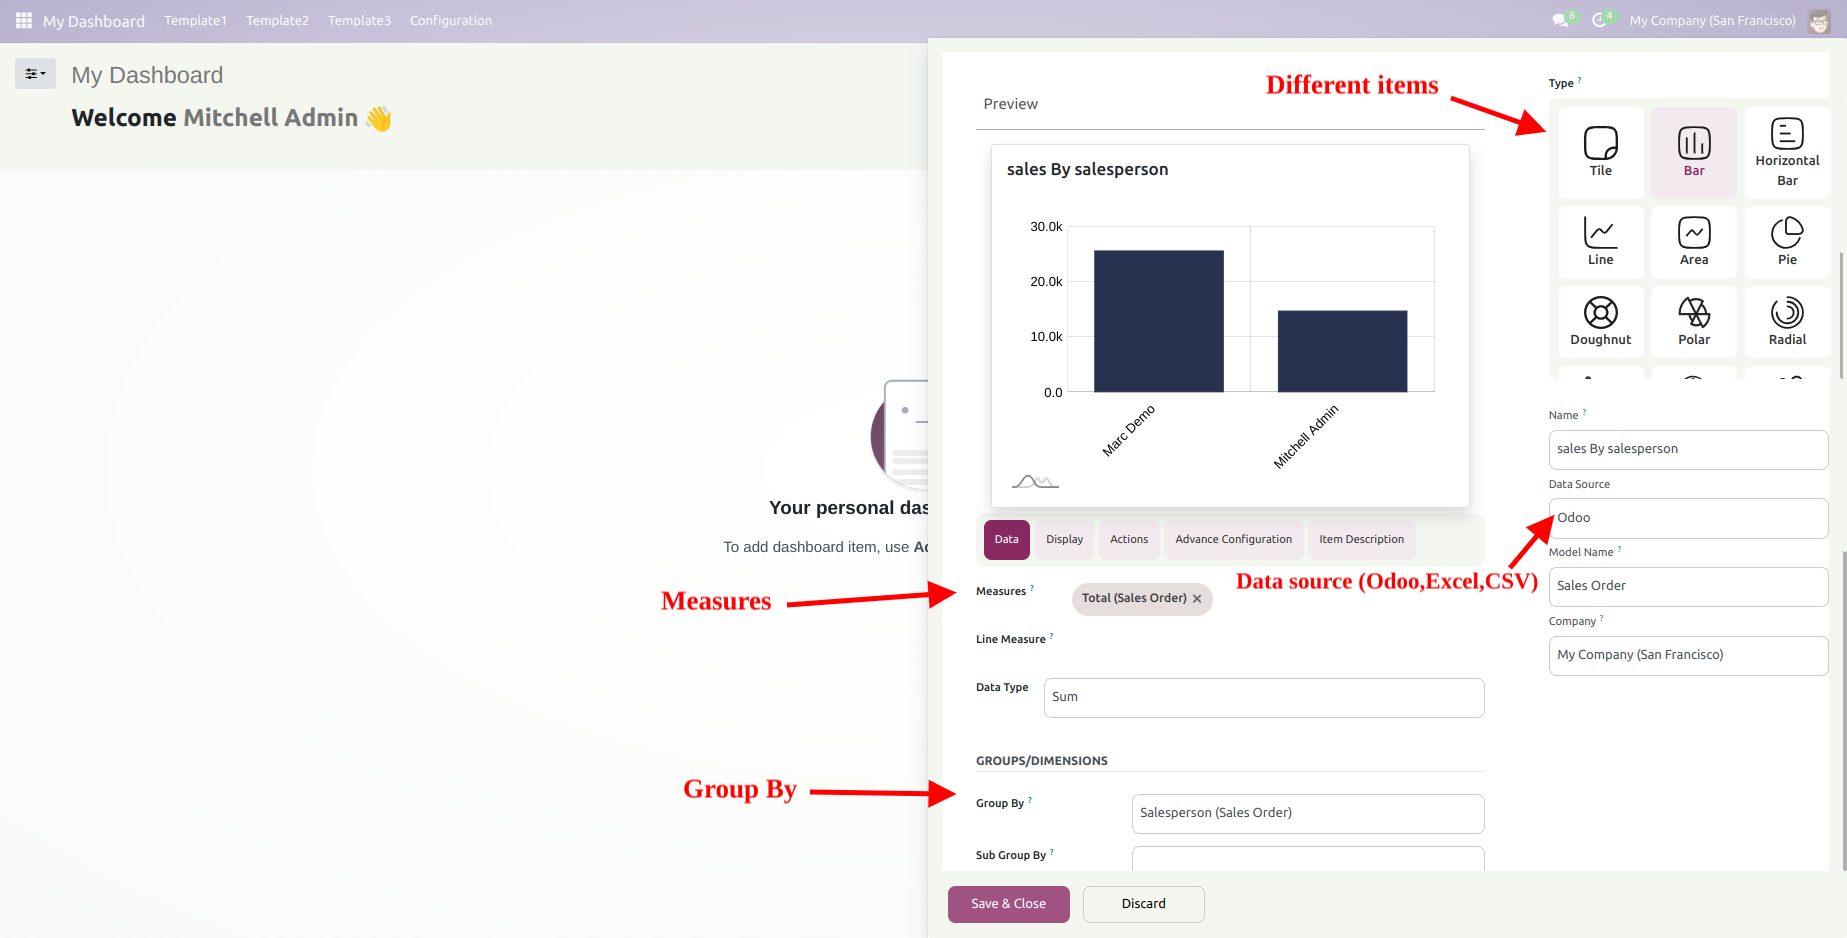
To better understand the steps of creating a chart, let’s take an example of a Bar Chart. To make a bar chart we have to fill in the required information like the data source. Currently, Dashboard Ninja supports 4 types of data sources (excel, CSV, and Odoo data).
First, let’s go with Odoo data to make a chart. To utilize odoo data we have to select measures and group them by column. The measures column supports the integer or monetary type fields and the group by column supports all the fields except ‘many2many’, ‘one2many’, and ‘binary fields’. Also, Dashboard Ninja offers the functionality of sorting data based on some fields. Additionally, you filter the item data by selecting the domain column in the item view.
To create a chart by utilizing Excel or CSV you need to upload your Excel or CSV file. After uploading the data you need to select the data type of columns of your Excel sheet. Ensure that you provide the correct data type for each field in your dataset. Once this process is done, click on the “Create Table” button. Your Excel or CSV data will then be stored in your system, allowing you to select the appropriate measures and groups based on the data. Then follow the same process as you did in Odoo data and your desired chart will be created.
2.2 Create a Dashboard with AI
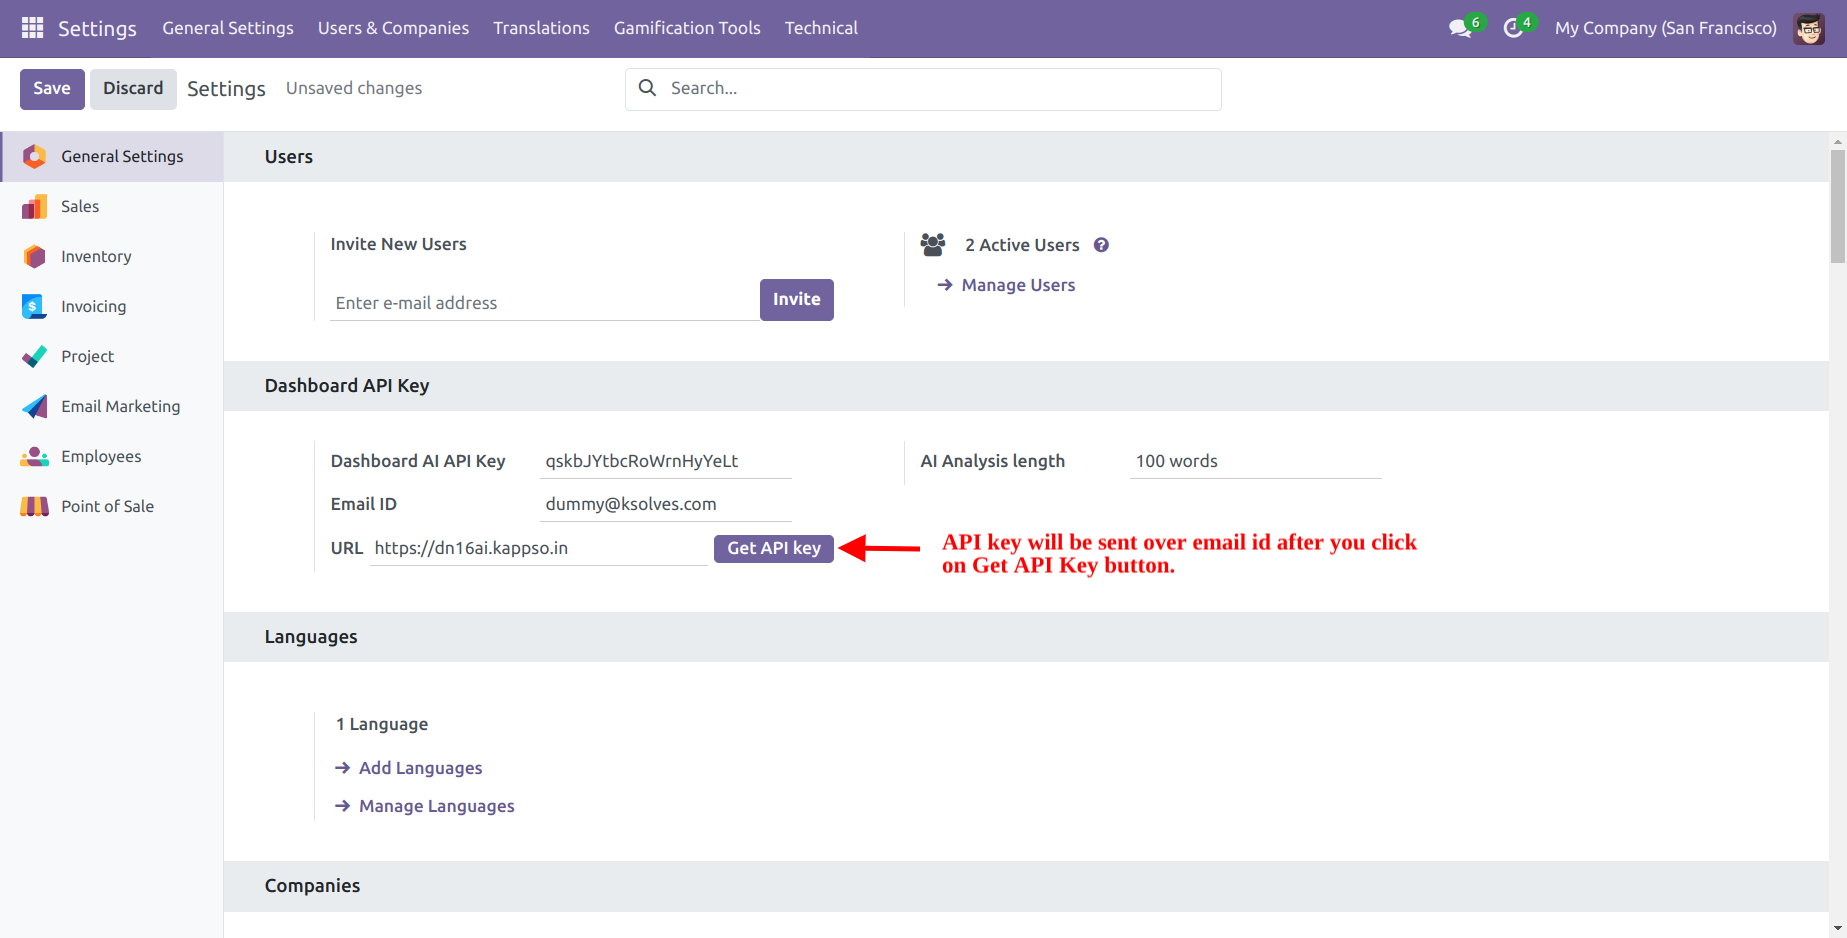
Let’s first configure the AI in Odoo. Go to settings and search for “Dashboard API Key”. Enter the email id and click on “Get API Key”. You will receive the mail that has the API Key which has to be filled in the API Key field. Now you are set to use the AI features of Dashboard Ninja.
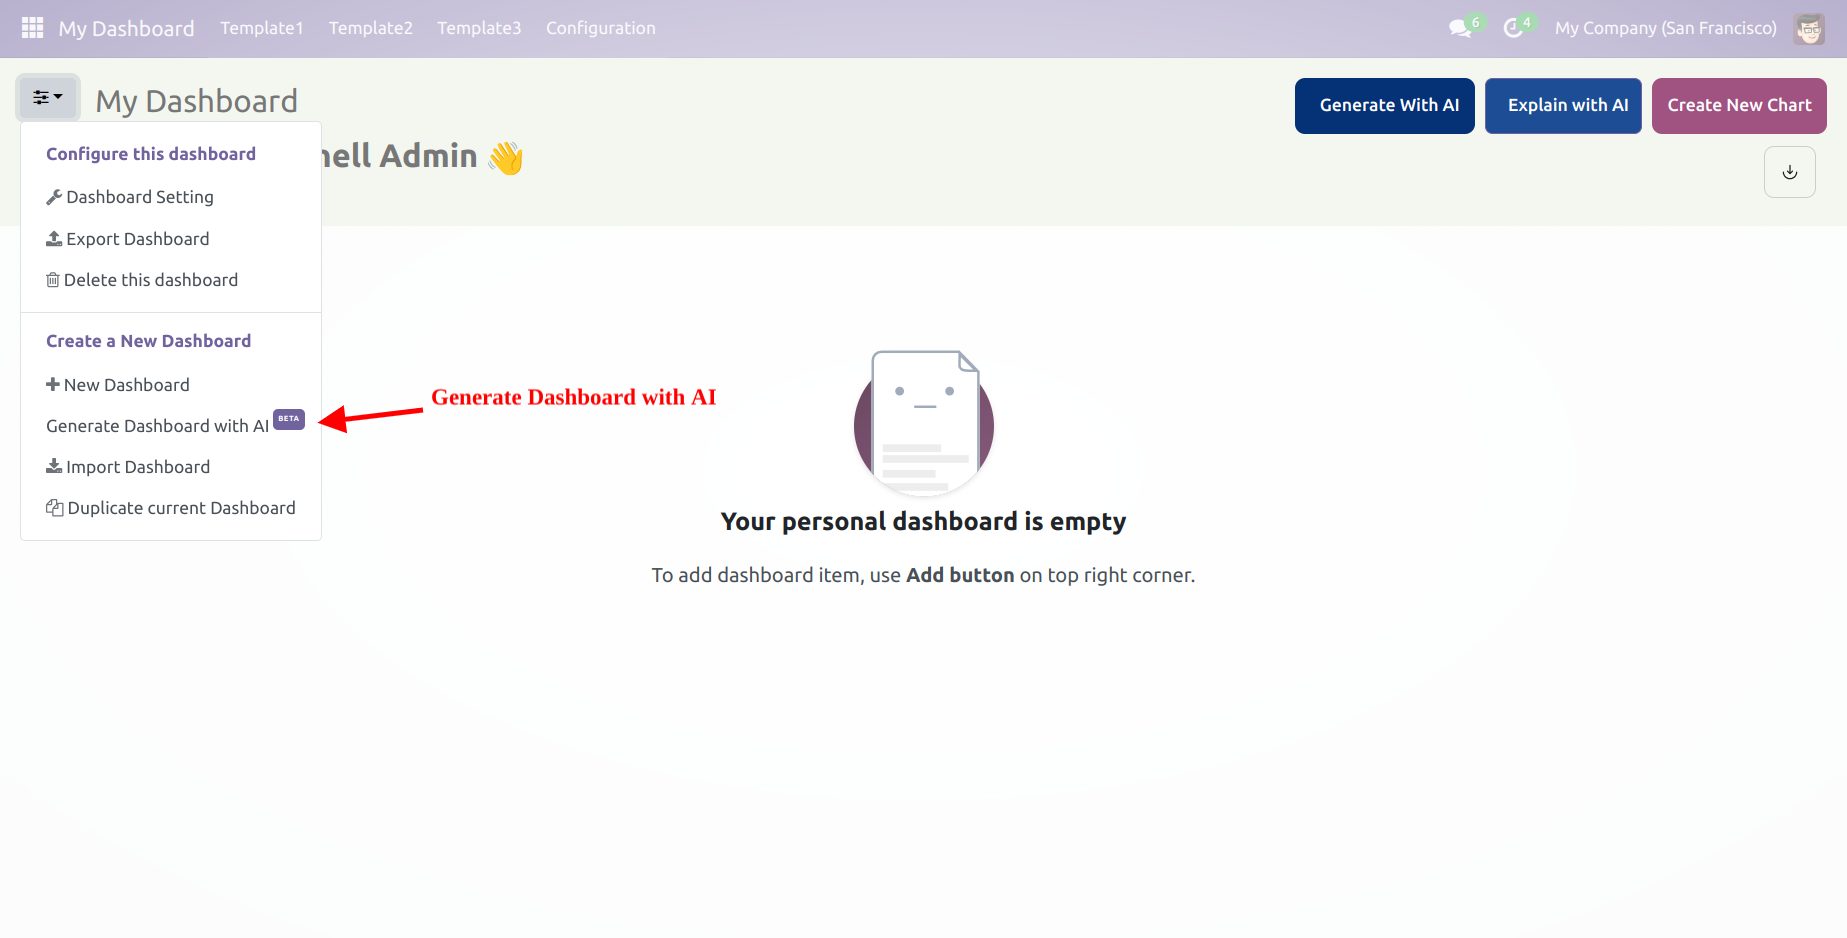
To create a new Dashboard with AI. click on the settings icon in the top left corner and then click on “Create Dashboard with AI”. Select the model name and other fields according to the requirement and click on “Generate Dashboard with AI”. AI will then prepare the whole dashboard with relevant charts and visualizations and save it as your new dashboard.

2.2.1. Create Charts with AI
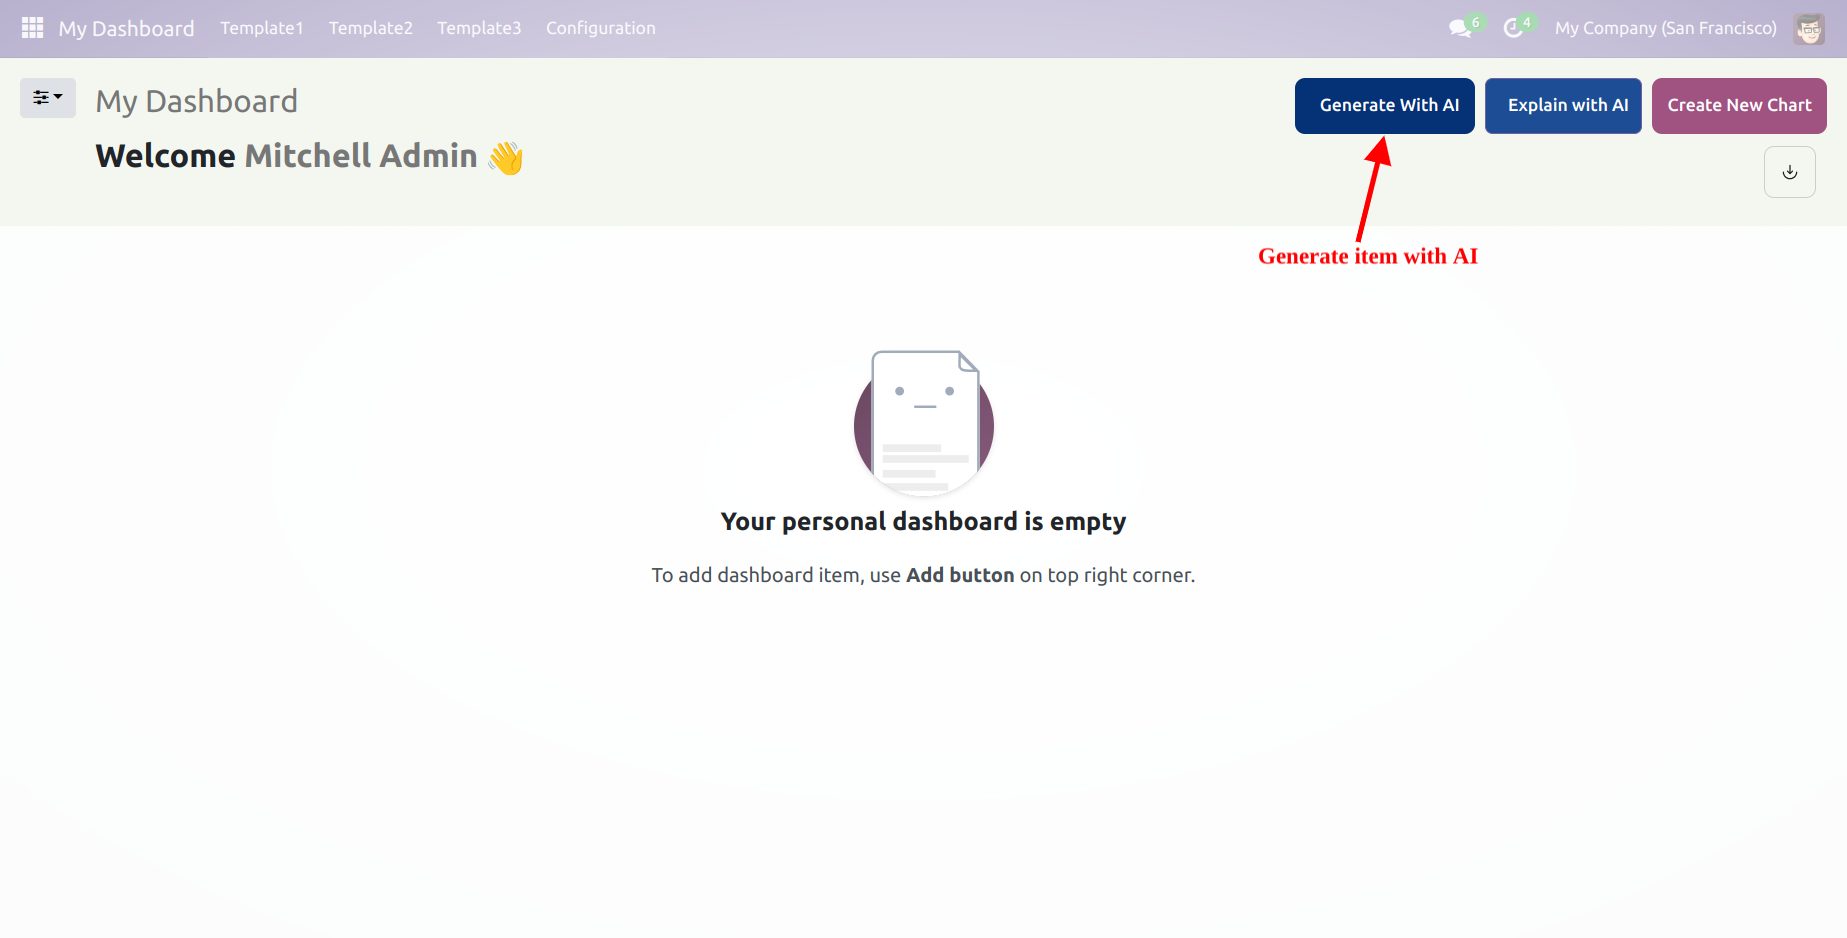
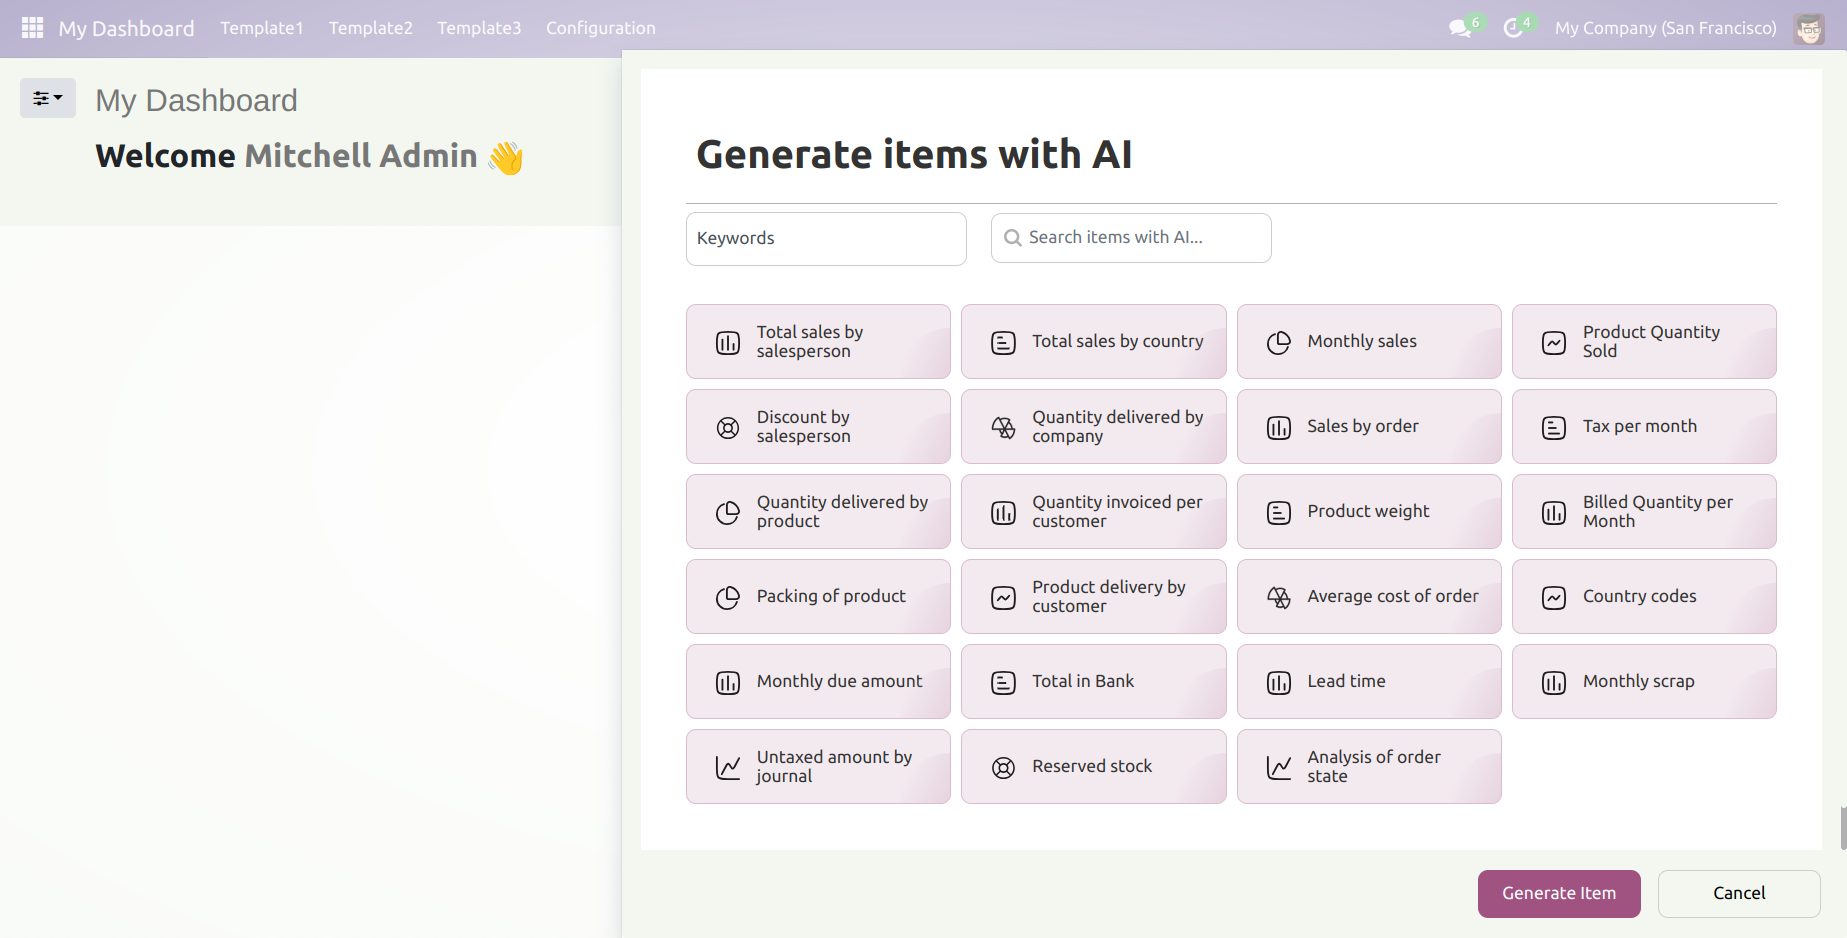
With the help of AI, you can add items or charts. To process it, click on the “Generate with AI” button present in the dashboard and induce the item by selecting a model or keywords.
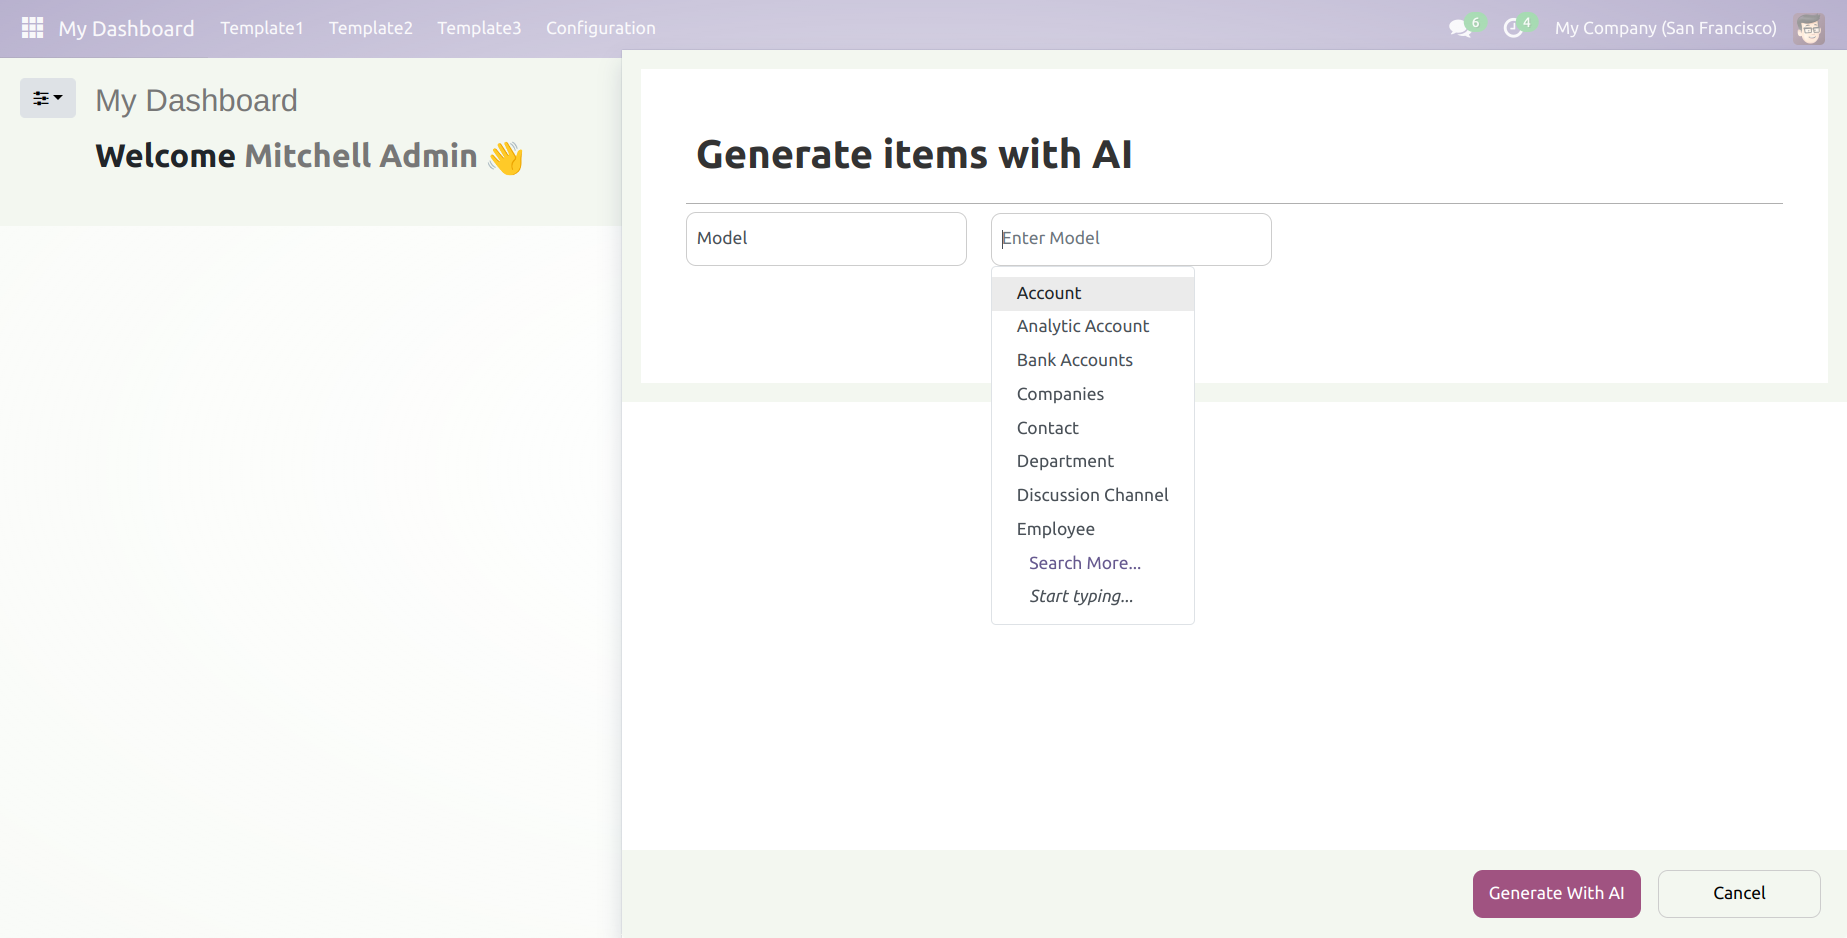
With Models, select any model that has noteworthy data. AI will generate relevant charts and KPIs, according to your requirements you can select the items and save them in your current dashboard.
To go with Keywords, you can select any one among 15 pre-defined keywords that Dashboard Ninja supports With AI. If you want to make a chart using a custom keyword you need to enter a meaningful keyword like “Total sales by customers” along with Model Name and further AI will generate the chart by utilizing the keyword.
Step 3: Enhancing Interactivity
3.1 Filters
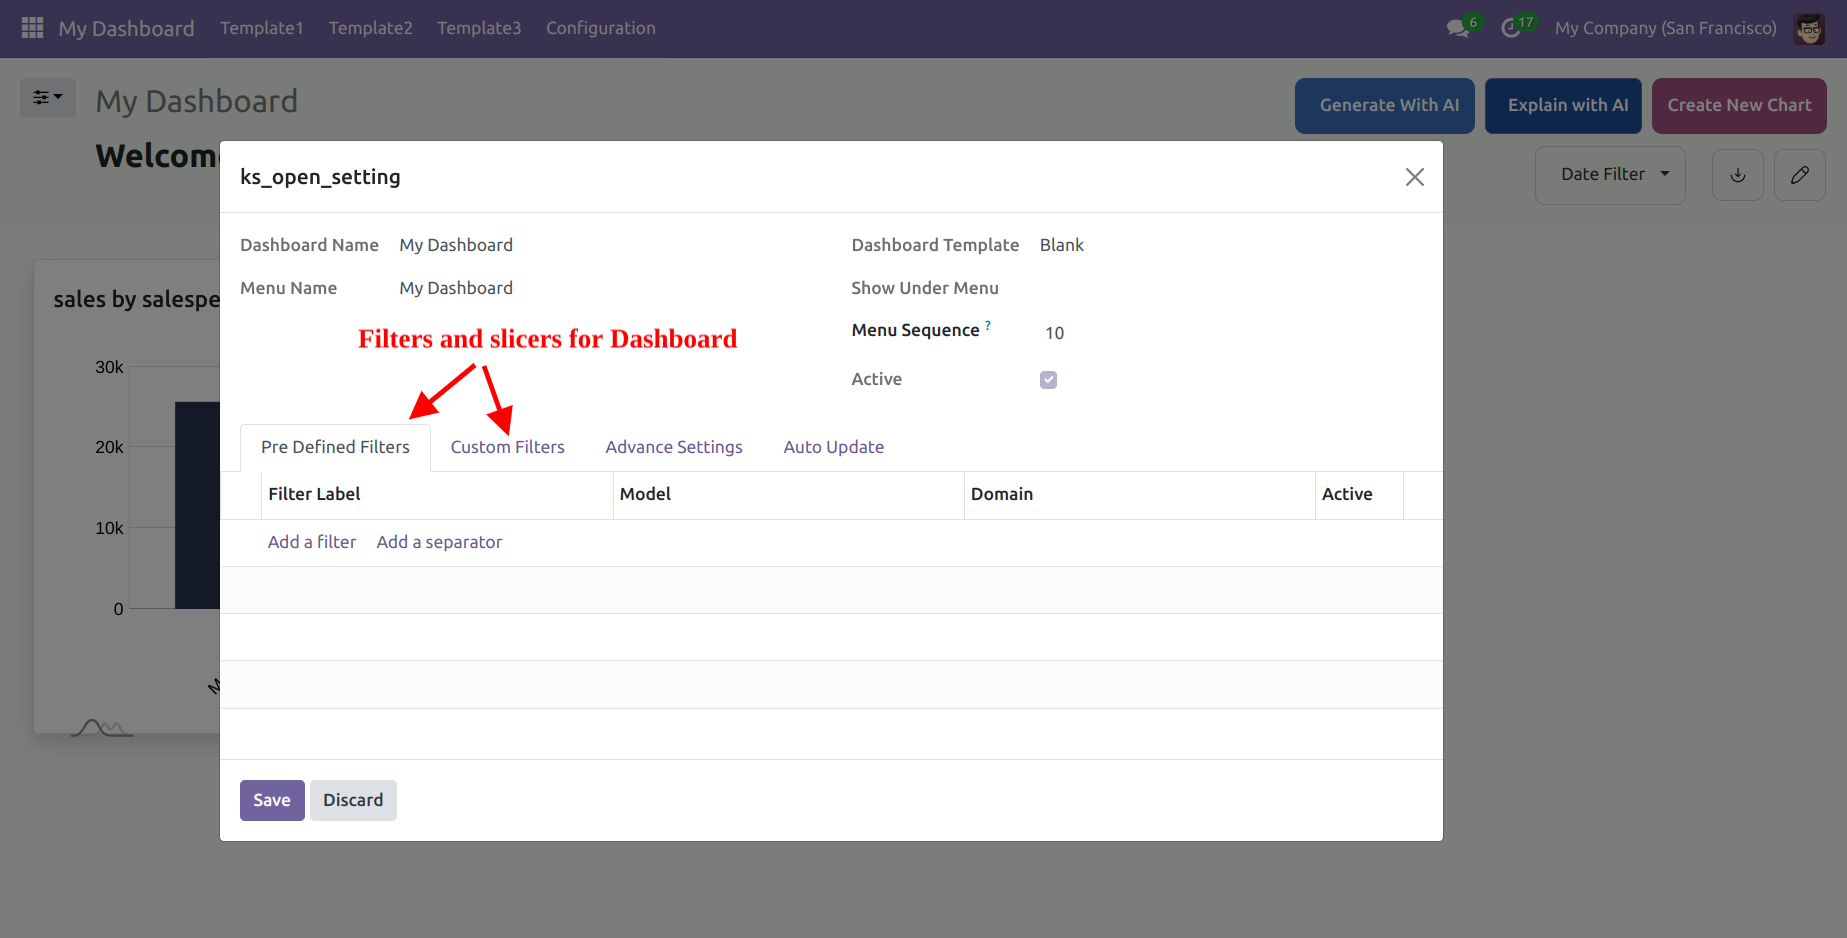
Now you have items on your dashboard, to which you can apply various filters on the dashboard. These include predefined filters, custom filters, and date filters.
Include filters to let users work with the data to provide options such as Date filters, Predefined filters, and custom filters. Filters can be applied to specific items or the entire dashboard. This will help users to drill down into the data and explore different aspects.
The date filter option allows users to present data in a timely manner over a selected period, with the choice of 20 predefined date filters (Last 7 days, Last 30 days, Last 90 days, and more) or a custom date range. Additionally, custom filters enable the creation of specific filters for particular fields of a particular model.
3.2 Real-Time Data Updates
Dashboard Ninja upgrades the data in real-time to give a 360 view of the business performance. This feature will update the data if any changes occur from the backend in real-time or after a specific interval.
Real-time data updates can be achieved by connecting your dashboard to live data sources or setting up regular data refresh intervals. Real-time data enhances the relevance and accuracy of your dashboard.
Step 4: Finalizing and Sharing
4.1 Reviewing Your Dashboard
Before sharing, review your dashboard to ensure all elements are correctly configured and the data is accurately represented. Look for any inconsistencies or places that require improvement.
Dashboard Ninja with AI also supports the live update feature.
For example, you have made one bar chart using the sale order model and someone makes changes to that model. The Dashboard Ninja will detect that change and update the items made using the sale order model without any manual refresh. To utilize the live update install the “Dashboard Ninja Live Update” module.
4.2 Exporting and Sharing
Dashboard Ninja offers various export options, including PDF, Excel, and JSON. Choose the appropriate format for your audience. You can also share your dashboard directly through email or by generating a shareable link. And finally, You can also export the Dashboard or send that dashboard to anyone over the mail.

Step 5: Advanced Features
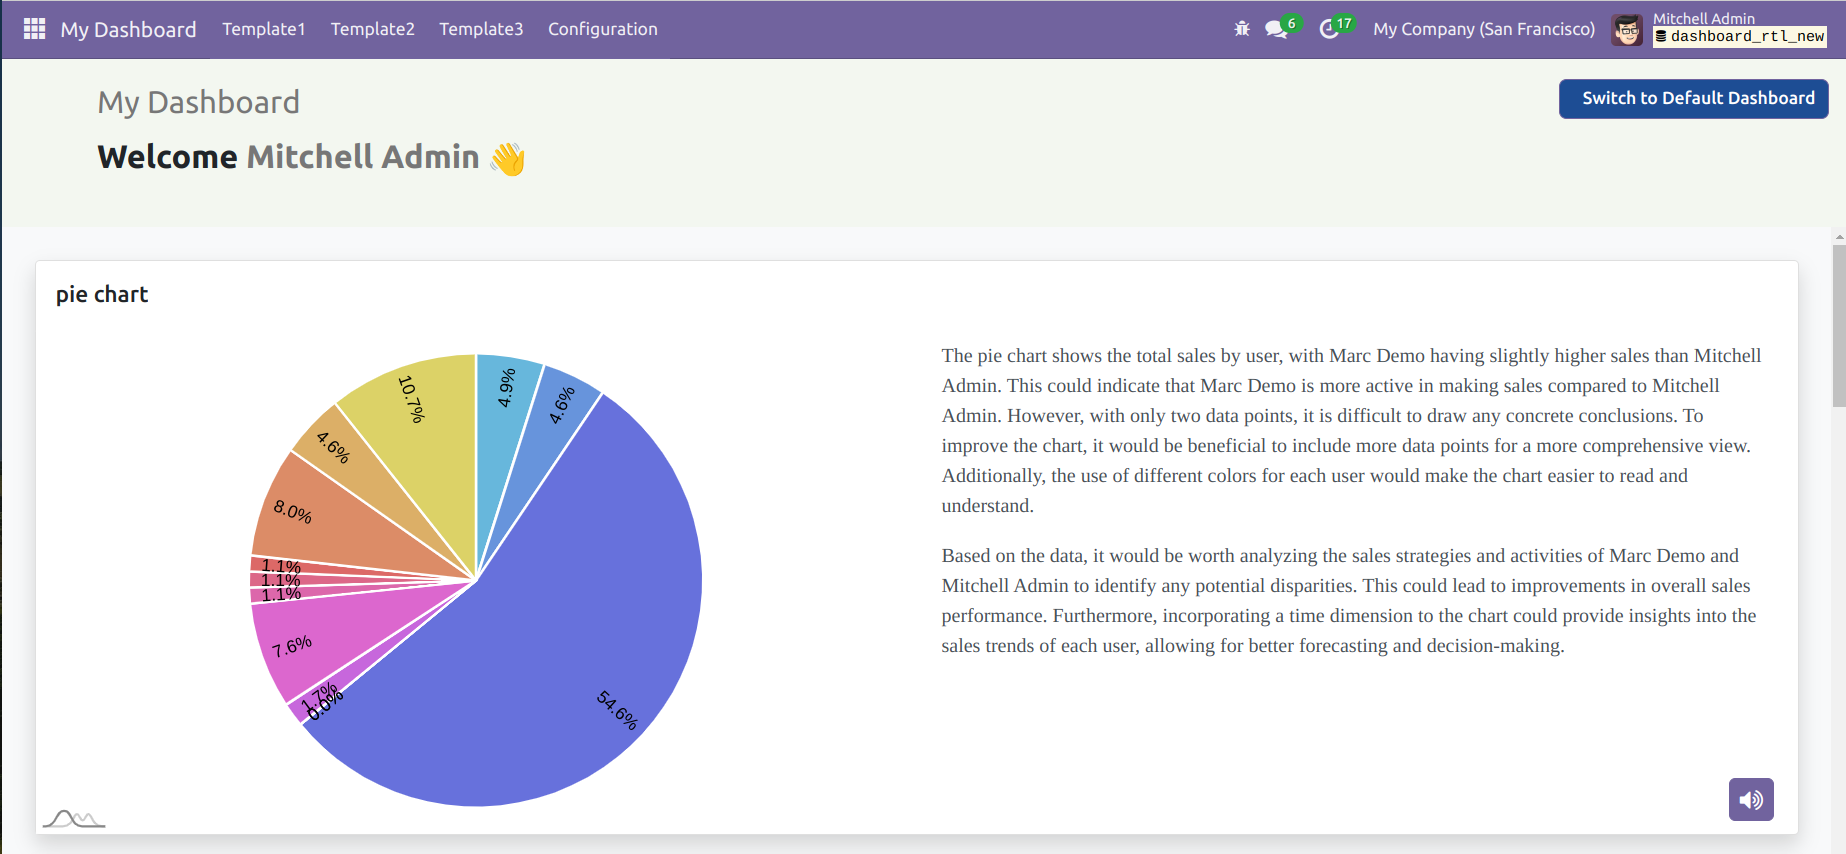
5.1 AI-Powered Insights
Dashboard Ninja leverages AI to provide deeper insights and recommendations. Utilize these features to identify patterns and anomalies in your data. AI-powered insights can help in making more informed decisions.
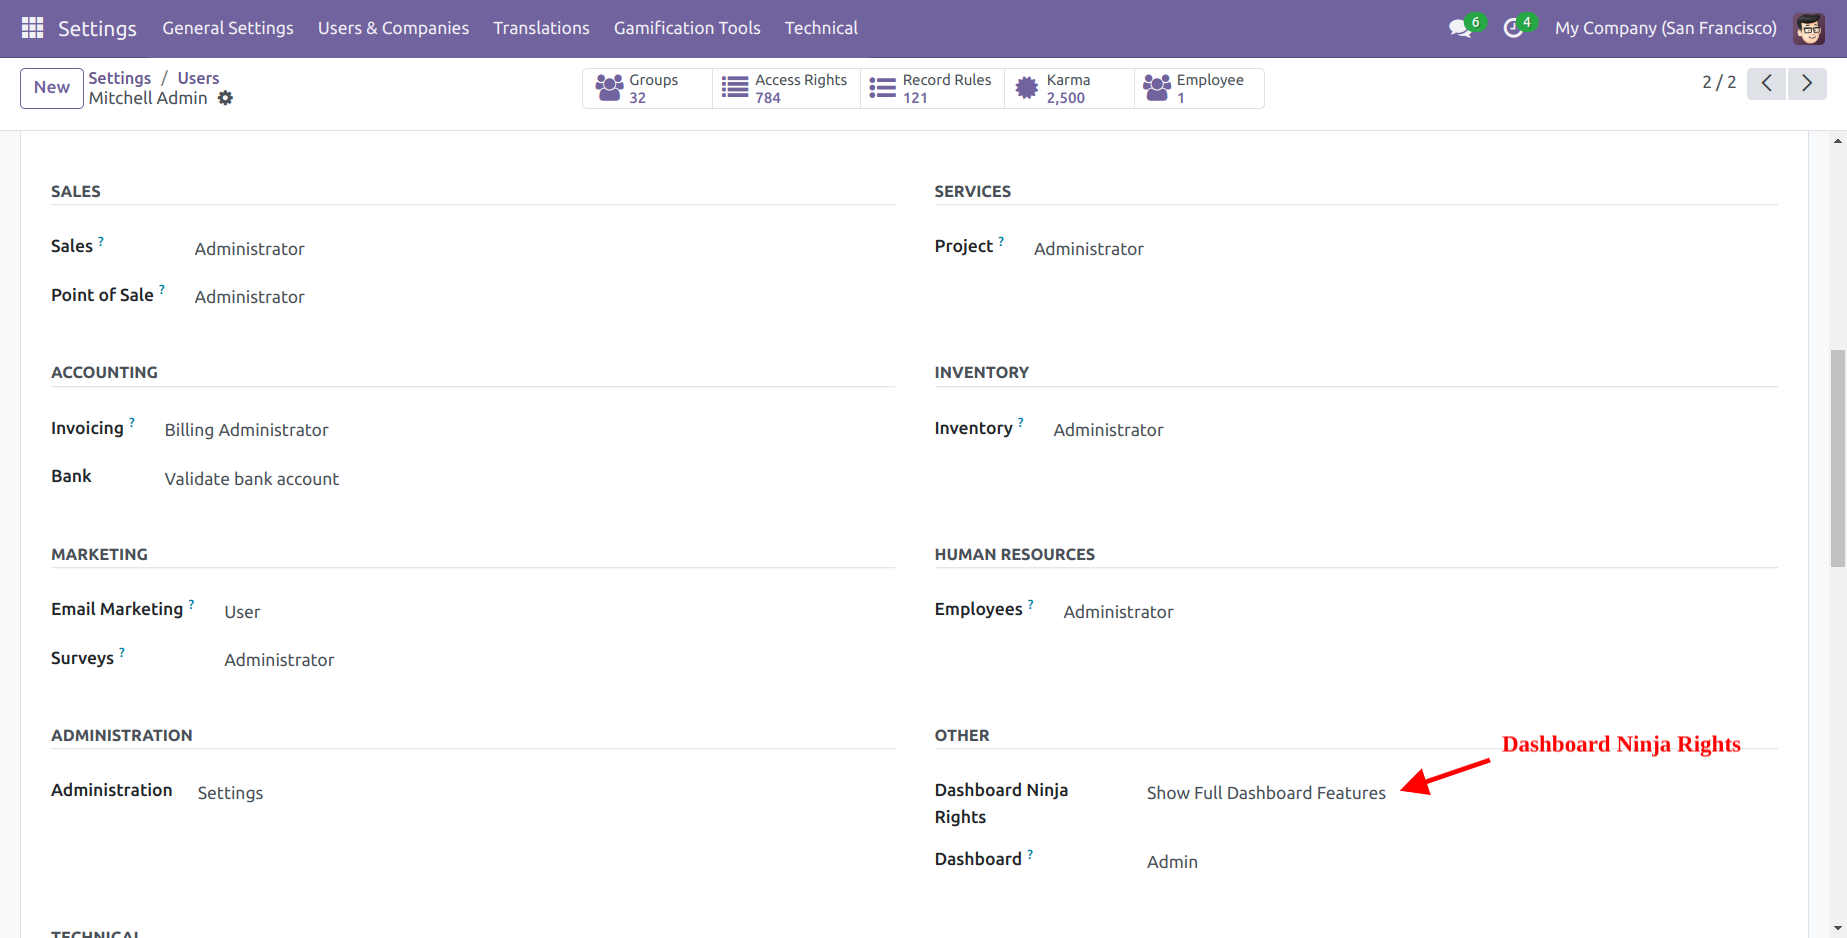
6.2 Access Rights
When working in a team, it’s important to manage who has access to the informative dashboards. This involves setting user permissions. Dashboard Ninja with AI provides “Full Access Rights,” allowing users to create, edit, and manage dashboards and charts. Only those with these full access rights can utilize these capabilities.
Conclusion
AI-powered dashboard creation guide explains how to create dashboards with Dashboard Ninja. It explains that it is a straightforward process that can significantly enhance your data analysis capabilities.
The above-mentioned steps will help you create dynamic, interactive dashboards that improve decision-making and offer insightful data. Dashboard Ninja has the features and tools to support you in reaching your objectives, whether you’re a data analyst, a business owner, or just someone trying to display data more efficiently.
If you want to reshape your Odoo dashboard and boost unparalleled efficiency, book a demo of Dashboard Ninja With AI. Ksolves will help you discover the future of business intelligence with its Odoo Dashboard optimization services.
Contact us at sales@ksolves.com to get started.
For more detailed instructions and visual guidance, you can watch the full video here.
https://www.youtube.com/watch?v=A2sujGagl6Q
![]()


AUTHOR
Odoo
Neha Negi, Presales and Business Associate Head at Ksolves is a results-driven ERP consultant with over 8 years of expertise in designing and implementing tailored ERP solutions. She has a proven track record of leading successful projects from concept to completion, driving organizational efficiency and success.
Share with